The first instructional post I want to publish here is a guide on how to wipe the configuration off and apply a basic configuration to a Cisco 2960 Managed Switch.
I have put together the instructions from several links I have had bookmarked for setting up a switch.
Step 1
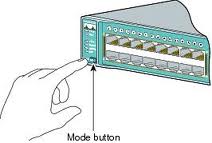
Connect up your console cable and power on the switch, whilst holding down the “mode” button:

Step 2
Initialise the flash file system with the command: flash_init
Step 3
Delete the config.text file from the flash directory with the command: del flash:config.text
Confirm the deletion of the file with the command: y
Step 4
Delete the vlan.dat file from the flash directory with the command: del flash:vlan.dat
confirm the deletion of the file with the command: y
Step 5
Reboot the switch with the command: boot
The switch now has no configuration and you it will boot up with factory defaults.
Step 6
Wait for the switch to boot up and you should see the following prompt:
Would you like to enter the initial configuration dialog? [yes/no]:
Step 7
Enter initial configuration dialog with the command: yes
Step 8
Enter a hostname you wish to use with the switch, and press Return. In DET, replace the XXXX with the School Code and YY with the Switch Number (ie. 01).
Enter host name [Switch]: XXXXSWYY
Step 9
Enter an enable secret password, and press Return. The password can be from 1 to 25 alphanumeric characters, can start with a number, is case sensitive, allows spaces, but ignores leading spaces. The secret password is encrypted and the enable password is in plain text.
Enter enable secret: secret_password
Step 10
Enter an enable
Enter enable password: enable_password
Step 11
Enter a virtual terminal (Telnet) password, and press Return. The password can be from 1 to 25 alphanumeric characters, is case sensitive, allows spaces, but ignores leading spaces.
Enter virtual terminal password: terminal-password
Step 12
(Optional) Configure Simple Network Management Protocol (SNMP) by responding to the prompts. You can also configure SNMP later through the CLI, the device manager, or the Network Assistant application. To configure SNMP later, enter no
Step 13
Enter the interface name (physical interface or VLAN name) of the interface that connects to the management network, and press Return. For this release, always use vlan1 as that interface
Enter interface name used to connect to the management network from the above interface summary: vlan1
Step 14
Configure the interface by entering the switch IP address and subnet mask and pressing Return. The IP address and subnet masks are shown below are examples.
If you are unsure of the Subnet Mask of your Curriculum Network, you can check it at http://broadband.doe.wan/BBPortal
I would recommend that you create a Spreadsheet to keep a record of the IP Addresses you have set statically on the school network, why not try out Google Sheets!
Configuring interface vlan1:
Configure IP on this interface? [yes]: yes
Subnet mask for this interface [255.0.0.0]: 255.255.252.0
Step 15
Enter no to setup the switch as an independant switch on the network, and press Return.
Would you like to enable as a cluster command switch? [yes/no]: no
You have now completed the initial configuration of the switch, and the switch displays its initial configuration.
Step 16
These choices appear:
[0] Go to the IOS command prompt without saving this config.
[1] Return back to the setup without saving this config.
[2] Save this configuration to
If you want to save the configuration and use it the next time the switch reboots, save it in NVRAM by selecting option 2.
Enter your selection [2]:2
Make your selection, and press Return.
You have now completed setting up your switch as a managed switch and will be able to access it over the network on VLAN1 using a ssh client (Putty on Windows or Terminal on MAC OSX).
Step 17
(Optional) The next thing I always setup is the HTTP Access so that you can use the Cisco Network Assistant to manage the switches on your network. To complete this, continue to follow this guide. If you do not want to use Cisco Network Assistant, you can leave this guide here.
Type “enable” and press the “Enter” key.
Type the Privileged Exec password when requested, and press the “Enter” key.
Type “config t” and press the “Enter” key.
Type “ip http server” and press the “Enter” key.
Type “end” and press the “Enter” key.
The relevant links which I used to put together this guide are;
http://notthenetwork.me/blog/2013/05/28/reset-a-cisco-2960-switch-to-factory-default-settings/
https://www.cisco.com/c/en/us/td/docs/switches/lan/catalyst2960/hardware/installation/guide/2960_hg/hgcliset.html
http://ciscorouterswitch.over-blog.com/article-how-to-enable-a-web-interface-on-a-cisco-catalyst-96023655.html
https://community.spiceworks.com/topic/681651-how-to-reboot-a-cisco-switch
https://www.cisco.com/c/en/us/td/docs/switches/lan/catalyst2960/software/release/12-2_55_se/configuration/guide/scg_2960/swcdp.html


Comments: